Top 3 Products & Services
| 1. 2. 3. |
Dated: Feb. 15, 2013
Related Categories
A+ Certification CompTIAFortunately, things are not always what they seem to be, so the first step is pretty much the same as in every other graphic card. After you have prepared for the OC, start an application by your choice. We are used to the MSI Afterburner, so we will show the examples on it. The first step is to go to the settings and unlocking the possibility of changing voltage if you want to get the maximum values.
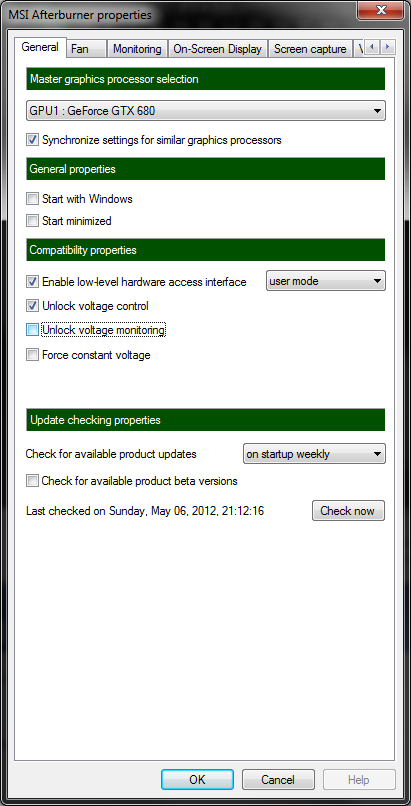
After that we will look what the maximum frequency for the GPU is at unchanged values for the voltage and the rpm of the fan. We will leave the memory for the end, because the principle of its overclocking is the same for every other graphic card, because dynamic overclocking doesn’t apply for it. The ideal thing is to start in certain steps of 20 to 30MHz or ask for a maximally stable value. In order for you to give the maximum space to the graphic card you need to increase the power limit to the maximum 139 or 159W depending on the model.

Test the new adjustments always, for example in the Combustor that comes with the MSI Afterburner or the Furmark, then thoroughly check what you get in a synthetic test, and after that you can go to the games and see what you are really getting. For the ones that are impatient, we recommend that you don’t skip this safety system, because if you set the offset of +200 like in the example shown below the graphic card will start going very optimistically with a high tact and it will soon hit the basic values.

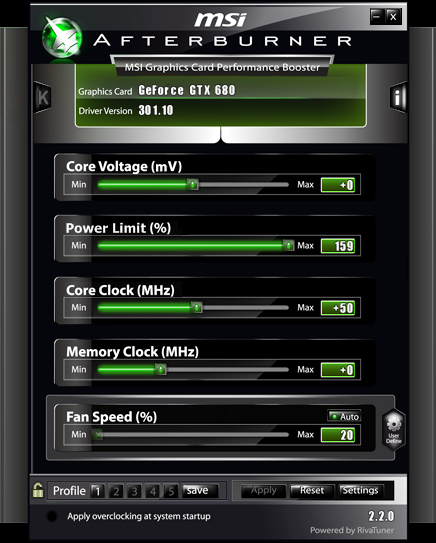
The card will finish the test and if it doesn’t block in the first few seconds everything will be fine. Still, this way will give you lower results and you basically won’t know anything new except that you overdid it a lot. As you can see, the GPU went on the test with a pretty high 1428MHz, but the frequency has been brought down to 1134MHz very soon, and this is the basic value for this model. Also, in 3DMark 11 benchmark we got the result that of 3274 which is default for this model. Because of that, we started with small steps to increase and stopped at +50MHz at automatic fan speed.
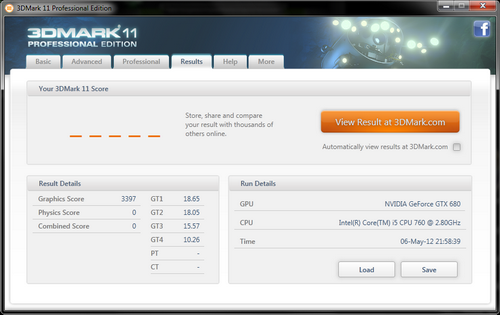
This brought us a increase in results, because the boost value was about 1291MHz, which is 90MHz more that what ASUS set to be basic. 3DMark 11 boosted the result from 3274 to 3397 which is about 5% increase, and it was achieved in a very simple and short way.
After that we set the fans to the maximum number of turns so we could see what we can get when we drop the temperature of the card to a minimum. In this way we gave ourselves maximum space for overclocking without increasing voltage. With the same system we got an extra 20MHz that gave us a maximum tact of 1311MHz for the "GPU Boost", a slightly greater result than before. Still, we needed a slightly bigger voltage for this adjustment (+37mV) so we could get an absolutely stable basis. Although the card ended a larger number of tests, after longer durations of strain it was known to block the showing after which the drivers were forced to do "recovery".
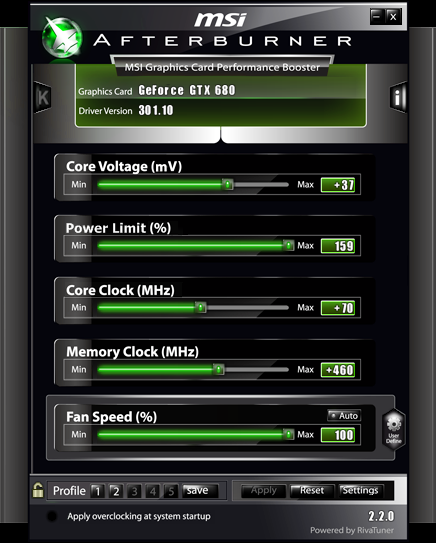
The interesting thing is that we couldn’t get more than these values even though we increased the voltage and that the final stable version for the GPU was +70MHz, whilst the memory managed to deal with the maximum 6920MHZ which is a real frequency of 1730MHz. It is obvious that voltage doesn’t have much influence on the 28nm Kepler that simply didn’t react well when it was increased. We assume that in conditions of extreme cooling you can get some result from a high voltage, but that is not something we are writing here about.
It is nice to notice that even in maximum frequencies, the DirectCU II didn’t have any problem cooling the GK 104, that achieved a maximum 57 degrees. Having in mind the fact that a greater temperature isn’t acceptable, it is clear that you can reduce the number of spins until you reach a optimal ratio of noise and temperature, and in the case that you are a more advanced user, consider the custom profile making that will regulate the speed of the fan by your choice, and most graphic card overclocking tools have this possibility.
We hope you understood the concept of overclocking GeForce GTX 680, and this system will, almost certainly, be applied to other models based on the Kepler architecture as well, like the GTX 670 and the GTX 660. The Kepler is really overclockable, although it may not seem like that at first glance. At the same time, this process is not that complicated, but it requires a little bit more patience and following some more factors.
Now that you've gotten free know-how on this topic, try to grow your skills even faster with online video training. Then finally, put these skills to the test and make a name for yourself by offering these skills to others by becoming a freelancer. There are literally 2000+ new projects that are posted every single freakin' day, no lie!
 Previous Article |  Next Article |