Top 3 Products & Services
| 1. 2. 3. |
Dated: Aug. 12, 2004
Related Categories
FlashTo build a flash site you first have to break down into pieces a regular site.
A. Interface, Navigation Menu, Any way you want to call it -> buttons that take you from place to place.
B. Text, Information, Content!!!
C. Animation!! <-This is mostly in flash sites.
* Those are the three elements you will incorporate in your flash site. How do you do all this using flash? Well that's what I'm here for. In flash you have Scenes, Frames, And Movie Clips. All of them are built upon a timeline. Now how do we create a site using a timeline. As you may know when you surf the web and visit sites It's interactive not like a movie so the timeline is a strange environment for a web site but as you may have noticed...it works! How you ask...well here goes:
* I'm going to teach you how I create a flash site, Its only one way and some of these rules are based on my comfort and not yours so learn and adapt. First of all Scenes, sound helpful right...well I don't use them. Actually, I do for one thing and that's to put my preloader in them. One scene for the preloader and another for the rest. A page in a flash site will consist of a frame or more. Only one frame if you won't have any animation more than one if you have animation.
* If you create a large site it will get big (take a lot of space) and take a long time to load because unlike a normal html based web site you load everything including images at once. So even if the user wants to view only one part of your site he will have to load it all and that means waiting for it all to load. We solve this problem by breaking up a site into several files (swfs). I usually create a base file, that contains the main intro animation, the main navigation bar, background graphics and music. And the content will be added using other swf files that will be loaded onto the main swf.
That's enough background and theory, lets start building the site!
1. First you create or import an image that you want to use as your background image.
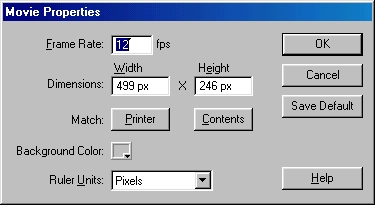
2. Import it and then change the size of the movie to fit the size of your background image. Go to: Modify > Movie... and change the size in the dimensions.
3. Rename the layer that the background image is on and call it background.
4. Now we work on the intro animation. I'll keep it simple.
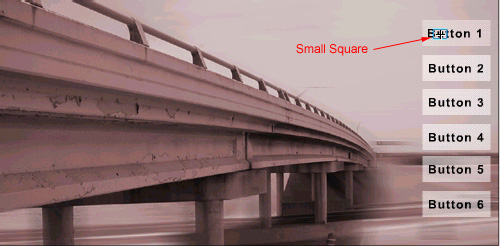
5. Create a new layer and call it button 1.
6. Create a small rectangle about the size of a button and then press F8. Name it "Button" and set it to Button.
7. Now repeat step 5 as many times as you want and add an instance of your button symbol any where you want by dragging it from the library (Ctrl+L) to where you want the button to be located. Its important you only place one button on each layer.

8. Click on one button on any layer and then Ctrl+Click on the rest of the buttons on the other layers.
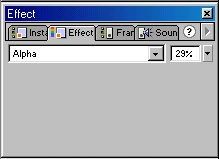
9. Go to the "Effect" tab set it to "Alpha" and about 30%.
10. Now go to about frame 8 and select and click and drag from your first button layer to your last one. Now you have selected all the button layers in frame 8. Next click F6.
This creates a keyframe in frame 8.
11. Next go to your Background layer and click on frame 8 and press F5.
12. Next go back to frame 1 on the "Button 1" layer. Click on the button and move it any where you want.
13. Repeat step 12 to all the other buttons on all the other layers.
14. Ctrl+Click somewhere between layer 8 and 1 on layer "Button 1" and drag up through all your button layers.
15. Now we'll add a "Motion Tween" go to the "Frame" tab use the settings seen in the image.

16. Finaly add a new layer after all those button layers. Name it "Button Text" then go to frame 8 and press F6 to create a new key frame and in it add text on top of where the buttons end up in. This is your button text.
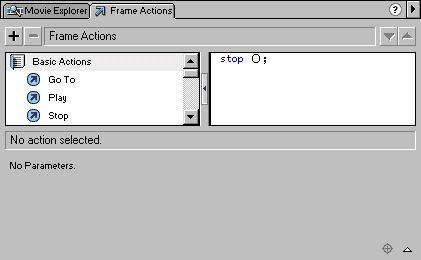
17. Create a new layer name it "Stop" and go to frame 8 and press F6 to create a key frame and double click on the frame. A dialog box appears. Double Click on "Basic Actions" and drag the arrow next to where it says stop to the right. Then close the dialog box.
18. Now you've created your intro animation and your navigation bar.
19. Lets Create different pages for the site. After all the buttons need to lead some where. This is where using multiple swf files comes in. Create a new layer and name it "Section 1". Go to frame 9 and create a keyframe (F6 incase you forgot). And drag an instance of "Button" some where over on the screen. Now resize it to a very small square, And make it completely transparant, like we did in step 9 just not 30% but 0%.
20. Go to frame 15 and create a keyframe there (Not telling you how to do it this time). Resize the white square to a very large square that will be the background for your page.

21. Click somewhere between frame 9 and 15 and add a "Motion Tween" (Step 15).
22. Click on frame 9 and go to the "Frame" tab like in Step 15 but this time add the "Label" "Section 1"
23. Go to frame 15 in our "Stop" layer and repeat step 19.
24. You can do the same for the rest of the buttons just start them from frame 16 to 22 instead of 9 to 15 and so on.
25. Create a new layer name it "Loading Layer".
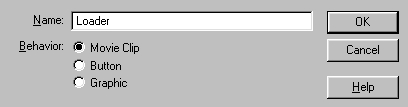
26. Go To "Insert>>New Symbol..." and under "Name:" type "Loader" and under Behavior choose "Movie Clip"
27. Select frame 15 in the "Loading Layer" layer and create a keyframe. Now drag an instance of our new movie clip (Loader) to the top left corner of the movie.

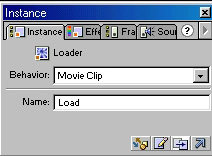
28. Travel on to the "Instance" tab and under "Name:" add "Load".
29. Create a new keyframe in frame 16 on the "Loading Layer" layer and then press delete so that the frame goes white.
30. Do the same on the last frames of the other sections for example if you created a section form 16 to 22 then repeat steps 27 and 29 on frames 16 and 22.
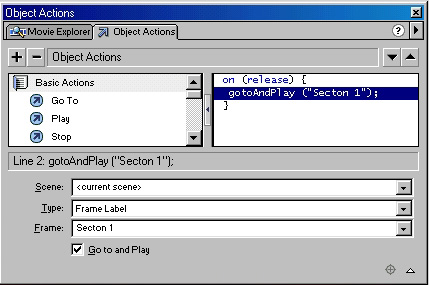
31. Right Click on the first button and choose "Actions". Drag "Go To" to the right and under "Type" choose "Frame Label" and under "Frame:" Choose "Section 1".
32. Do the same for the rest of the buttons.
33. Here come the multiple swfs!!! Create a new movie (be sure to save the one you have in case your computer crashes).
34. Change the dimensions of the movie to the dimensions of the main one by repeating step 2.
35. Add your content to the movie. Don't forget that what you did in the other movie will be your background. I just added some text. Don't forget to add a "Stop" Action on the last frame.
36. Save the movie as "Section 1" in the same directory you saved the main movie in. Publish it by pressing Shift+F12. This creates the swf file.
37. Repeat steps 33-36 for the rest of the sections.
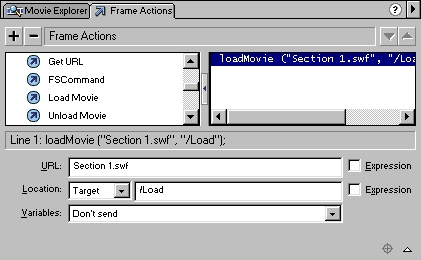
38. Go back to the main movie and double click frame 15 on the "Section 1" layer. The actions window appears again. Find "loadMovie" under the "Basic Actions" and drag it to the right.
URL:Section 1.swf
Location:Target
/Load
Vriables:Don't Send
Close the dialog box.
39. Repeat this step on the last frame of the other sections (for example frame 22).
40. Save your work and then press F12 to publish. Play around with it a bit. You'll notice a problem... if you click on Button 1 when you're already in that section it repeats the animation or if you press on Button 2 in the middle of the animation on the Button 1 sequence then it cuts it in the middle. Well Solving that problem is next.
41. We solve this using two variables: "CurrentSection" and "Proc". CurrentSection tell us which section we're in and "Proc" tells us whether an animation is taking place right now.
42. Create a new layer and name it "Action" Create a keyframe at the beginning and end of every section. That means at 9 and 15 and 16 and 22 (and so on). Also Create one at the first frame.
43. Double Click on the first frame in order to open the actions window. Drag "setVariable" under Actions to the right and Under "Variable" write "CurrentSection" and under "Value" write "Main" and both the "Expression" boxes unchecked. Drag "setVariable" again and Under "Variable" write "Proc" and under "Value" write "False" this time the second "Expression" box should be checked.
44. Now Click on frame 9 (same layer) drag "setVariable" and Variable:Proc
Value:True Unchecked, Checked. Click on frame 15 drag "setVariable", Variable:Proc
Value:False Unchecked,Checked.
Drag "setVariable" again and Variable:CurrentSection Value:Section 1
Unchecked,Unchecked.
Click on frame 16 drag "setVariable", Variable:Proc Value:True Unchecked,Checked.
Click on frame 22 drag "setVariable", Variable:Proc Value:False Unchecked,Checked.
Drag "setVariable" Variable:CurrentSection Value:Section 2 Unchecked,Unchecked.
45. Right Click on the first button and choose Actions. Drag "if" under "Actions" to the right. "Condition:Proc eq False". Drag "if" again. "Condition:CurrentSection != "Section 1" ". And arrange it like in the image.
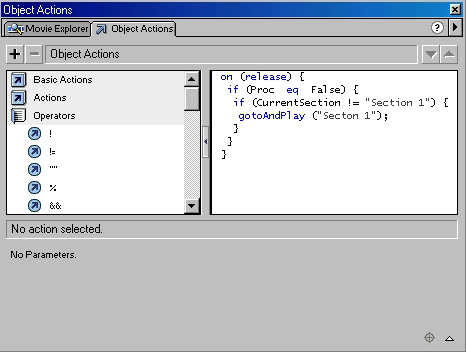
46. Do the same on the other buttons just change the CurrentSection condition to "Section X" (X being the section number).
47. Publish by pressing Only F12 this time and test!
That's it. Now a bit of clearing up. We built this flash site in this particular way for the following reasons:
a. The site is divided to multiple swfs thus preventing the user from waiting a long time before the site is completely loaded.
b. You my have noticed we used the "loadMovie" action but not the "unLoadMovie" Action. This of course is on purpose. The UnloadMovie command deletes the swf from the cache. My way doesn't. My way loads a new movie each time on top of the old movie. All are cached and that is very good for business.
c. By the way you might have noticed that I havn't added a preloader. Just create a new scene before every one of your movies and in it insert your preloader.
Now that you've gotten free know-how on this topic, try to grow your skills even faster with online video training. Then finally, put these skills to the test and make a name for yourself by offering these skills to others by becoming a freelancer. There are literally 2000+ new projects that are posted every single freakin' day, no lie!
 Previous Article |  Next Article |