Top 3 Products & Services
| 1. 2. 3. |
Dated: May. 25, 2013
Related Categories
Web HostingHTML
PHP Programming
SQL
How to Install WordPress
Today we bring the second part of the How to install WordPress article.
First article you can see on this link.
....On the left side you should see a WordPress link.
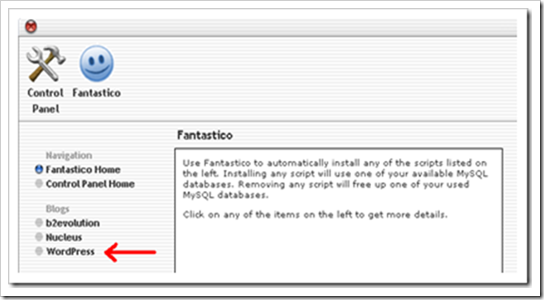
Click on New Installation and follow the instructions. You will be asked to fill certain information such as e-mail address, the wanted WordPress username and password and some other configuration things.
Warning! You will see a field appear that is called Install in Directory, make sure you leave that field empty if you want your WordPress page to show up only when someone goes straight to your domain name. After that, click on Install WordPress!
On the next page you will get a MySQL username and access the URL. Right now you probably won't need this, but later you will.
Then click on Finish Installation.
Setting the Web page
After you access your page and see the chosen theme, you just need to add /wp-login to the main URL and sign in using the information you just set (www.nameofyourdomain.com/wp-login)
You should reach a page that looks like this.

This page is called a WordPress Dashboard. Get to know this part because you will be using it a lot. That is the matrix of your Web page. All changes on your Web page will go through the Dashboard.
The first thing you will notice are the quick links for posts, pages, categories, tags and comments as well as the quick link that you can use to change the theme. On the left side you can see a large number of sub-options, but for now we will focus only on those that are most important:
- Posts – here you create and format your content. Next to text, in the post you can set and format pictures and videos. Also, this place is where you will add tags and determine the categories and pages where the created post will be shown.
- Media - this is use for managing photos and videos that you added to the site.
- Pages – use for adding new pages on your site.
- Appearance – enables you to fully adjust the look of your site, starting with the theme all the way to the Sidebar widget.
- Plugins – There is a great number of useful plugins that you can install on your site through social buttons, multimedia, plugins that will speed up your site, prove the visuals and a lot more.
- Users – this part is for adding new of changing the existing user settings, such as user passwords, profiles, e-mails, etc.
- Settings – this is a place where you make settings of many things such as the name of your blog, the description, the format, follow comments and media settings, etc. Also, you will be able to access and reconfigure third party pages.
At the end, a constant backup of your WordPress page is something that should be a part of your daily routine. If you want to know something more , just folow the link.
Now that you've gotten free know-how on this topic, try to grow your skills even faster with online video training. Then finally, put these skills to the test and make a name for yourself by offering these skills to others by becoming a freelancer. There are literally 2000+ new projects that are posted every single freakin' day, no lie!
 Previous Article |  Next Article |