Computer Softwares
 This is a perfect tutorial about shading, Variation, and Detail in graphics relating to MAYA mostly.
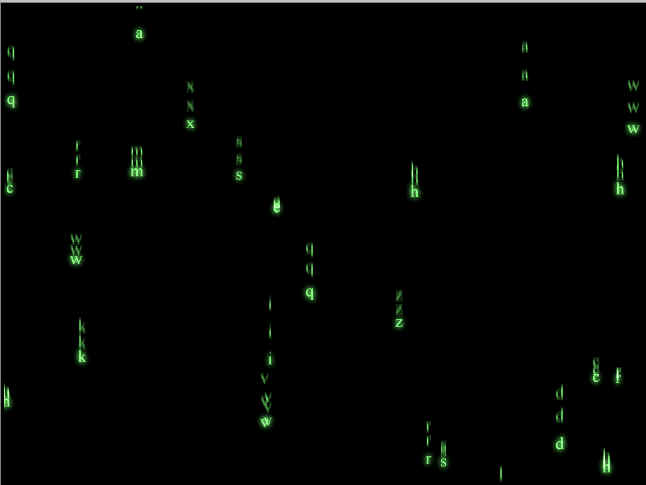 In this tutorial, we are going to reproduce some of the logo effect of the film "Matrix" using MAYA particles and expressions.
 You wouldn't go to a doctor who had never been to medical school, or hire a lawyer who never studied law. One side-effect of a world advancing as rapidly as ours is that fields are becoming more and more specialized and narrow. People can no longer get by on general knowledge in their careers, something I found out for myself not too long ago. I'd been out of high school for two years, scraping by on my own and picking up scraps of programming as I went. I saw all of the self-taught programmers breaking into the IT industry, and I hoped to do the same. After all, IT is one of the few industries out there where being creative and a quick learner is more important than a degree.
 This tutorial discusses miscellaneous points about reference, cheating, and why we like certain types of images better than others.
 One famous saying says that programmers are machines that turn caffeine from coffee and Coca Cola into a programming code. And if you ask a programmer when does he like working the most and when is he most productive - he is probably going to say late at night or early in the morning, that is when he has the greatest energy and concentration to work.
 In the following article we are going to talk about Ligatures and OpenType typography in Word. While you can explore the Advanced properties and OpenType font behavior with the Font window opened, watch out for the ligatures that show up in the second appearance of the word Office on the image...
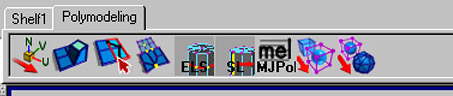 This article will create a special shelf for the tools we use the most in MAYA. We want to create a special shelf for the tools we use the most, we want to keep it fairly clean and not over-crowd it, so we can find the items quickly, and have a small learning curve.
 If you are looking for career counseling, and are in a dilemma as which branch of computer science you should go for, this small section would hopefully help you in selecting the best option according to your nature and interest. In computer industry, there are several branches from which you can choose any one. The reason behind this is that in this industry, you can get success and/or fame only when you are skilled, and full of knowledge.
 3D Modeling and Animation: The Creative Profession of Computer Animation & Visual Effects, the Film Industry, the Companies, the Hardware, the Software. Ever dreamt of working for the film industry? You dont have to be an actor or a director to do so. Computer Animators share equally the glamour of a blockbusting creation.
  What is Maya?
Maya has transformed the computer graphics business, bringing unprecedented power to the desktop while reducing the cost of entry for creating state-of-the-art CG. Recently, with the free ?Personal Learning Edition,? it?s become possible to gain Maya expertise without spending a penny. The world?s craving for CG is only increasing: With Maya expertise, you can help satisfy it.
Whether you?re watching The Lord of the Rings, The Mummy, Ice Age, The Matrix, or the latest Blockbuster video commercial -- or a scientific simulation of the evolving universe, or a courtroom accident reconstruction, or the latest EA or LucasArts game -- you?re watching Maya at work. To do all that, however, Maya has become so deep and feature rich that nobody can possibly know it all.
Tips
Adaptative Bump
A simple way to control the depth of a bump according to the distance of the camera is to use a Distance Tool constrained to the camera.
Here is the process:
- First create a distance tool and constraint the two locator to the object and to the camera.
- Now in the hypershade connect the distance attribute of the distanceDimensionShape to the Xinput of a Multiply/Divide Node
- Then connect the Xoutput of the Multiply/Divide to the BumpDepth of your Bump node.
The Multiply Divide is used to reducing the bumpiness
(cause by default the same value as the distance is used (eg: distance camera 500 = Bump Depth 500))
so we multiplied the Xinput by 0.05 for a reasonnable value.
We also added a nother Multiply Divide for the Depth Filter to reduce flickering. But this time we did multiply it by 0.01 so higher the bump depth is higher the filtering is.
Did we say simple?
Motion Blur On An Animated Texture
Open up the Attribute Editor for the texture file;
Navigate to Effects-> Filter and Filter Offset;
Increase the Filter from 0 to 2 or higher;
Increase Filter Offset from 0.000 to 0.005 or higher;
These settings will give the animated texture map an overall blur. The effect can be given a bit of directionality by stretching the texture in the direction of movement.
How do I license Maya?
There are several methods to license Maya: Online Product Activation (OPA) and through the Software Product Authorization Request (SPAR).
Please go to the following URL to get information on OPA and SPAR:
http://www.alias.com/maya/support/faqs
NOTE: This link also has information on how to setup a floating licenseserver.
Middle Mouse Button Doesn't Work
There are 2 solutions, 1 set the following:
Right mouse button = Click, Select
Middle mouse button = Middle mouse button
Left mouse button = Contextual menu
Also, if this doesn't work, then try removing the mouse driver. In some cases, a wireless mouse will not work with Maya because you need to have the driver uninstalled.
Turn Off an Image Plane's Primary Visibility
The user must create a primitive 2D geometry plane and match it's location with the renderable camera. Once the plane and the camera are matched correctly, import the image file texture and assign it to the plane. The planes Primary Visibility can be turned off within the Attribute Editor (Render Stats menu-> check off Primary Visibility).
For objects to reflect and refract this "imitation" image plane, ensure Raytracing is turned on within the Render Globals (Window-> Rendering Editors-> Render Globals). The objects within the scene will now reflect and refract the image assigned to the geometry plane, which now has its primary visibility turned off.
Render On Multiple Machines without a Render Distributor
Save your scene file onto each computer that will be utilized for the render. On each computer open up the scene file and adjust the Render Globals to the frame increments that are to be rendered on that machine. For example, if the scene to be rendered is 500 frames long, and you will use 5 computers to render out the scene, set the Render Globals on computer #1, to render frame 1 100. On computer #2, set the scene file Render Globals to render frame 101 200, and so on. For greater ease and organization, re-set the project directory to where you want the rendered images to be rendered to, by going to File-> Project -> Set. Navigate to the directory to where you want the images to be rendered to. Do this for each scene file on each computer to ensure that the all rendered images go to the right place.
Rendering can be done far more efficiently, with Command Line rendering. Command Line rendering can override the Render Globals, thus eliminating the need to open up a scene, adjust settings, etc.
After saving the scene file on each machine, open a Command Prompt window (on Irix open a shell), navigate to the scene directory saved on the first computer, and type:
Render filename1.mb -s1 -e100 rd computername/path/to/images/directory
The -rd command re-directs where the rendered images will go. Enter the path to the directory where you want the images to be rendered to. On the next computer open a Command Prompt (or shell, on Irix), navigate to the where you saved your file, and type:
Render filename1.mb s101 e200 rd computername/path/to/images/directory
Repeat this for the rest of the computers to render on, ensuring that the appropriate number of frames are being rendered. Using this technique, all the images rendered will end up in one specified directory.
NOTE: When accessing folders and directories across the network, ensure that all directories involved are Shared.
Any computer intended to be used for rendering needs to have Maya installed on it. Make sure it is the appropriate version of Maya that is installed.
Mental Ray Does Not Recognize and Can't Use Maya's BOT Files
If you use the makebot command and try to re-link the texture to the newly created BOT, you will get an error. If you turn the Use Cache flag ON, you will not get an error, but be advised that the files are NOT being converted to BOTs.
Mental Ray's version of BOT files are known as Memory Mapped files. You c reate them by using the 'imf_copy' utility. The syntax is:
'imf_copy -p inimage outimage'
This command will turn your image file into a filtered .map file (which is similar to Maya's mipmap file). You then have to re-link this as the new image file. Maya cannot read the .map file, so when you re-link this, you will get an error stating that Maya couldn't load the file. Your Shading Material swatch will appear black - as if it's missing the texture. However, Mental Ray will render this correctly as a Memory Mapped file.
Rotate Plane Ik Handles Move
Turn "Enable IKFK control" to OFF in the skeleton menu.
Changing Opengl States in a Hardware Shader
If you change any other OpenGL state variable (such as line width) within your hardware shader, you must be sure to store and restore the appropriate attributes. Failure to do so will result in Maya drawing in an unexpected state as a result of your change to the OpenGL state.
Before you set the line width, etc. store (push) all the existing OpenGL attributes that relate to what you are changing Then restore (pop) them when you are done drawing.
For example if you are changing the line width settings while in yourshader, you'd have to add GL_LINE_BIT to your glPushAttrib( ) call.
As an example: glPushAttrib( GL_CURRENT_BIT | GL_LIGHTING_BIT |GL_LINE_BIT )
This can be placed in the hardware shader's bind() method, enclosed within calls to view.beginGL() and view.endGL() along with the changes to the OpenGL state. Pushing the attributes could happen in your geometry() method, but typically the bind() is used to set up OpenGL for your drawing, so it makes sense to do it in bind().
The pop should happen after you are done drawing and changing. Typically it is done in unbind(), again enclosed within calls to view.beginGL() and view.endGL().
Can't I Save MObjects in MPxCommand
You can think of an MObject as a smart pointer. All it contains is apointer and some type information.
Maya does NOT own the MObject. Maya DOES own the object that it pointstoo. Destroying an MObject does NOT delete the object that it points to.
Conceptually, you can sort of imagine an MObject as:
typedef void* MObject;
In real life, it's a real C++ object, but it basically serves the purposeabove.
Now, why shouldn't you hold onto an MObject for a long time? Lets say thatyou have a command called foo that creates the DAG object "fooShape1". Now,lets say that you write a command called bar that acts upon that object.So, here's the MEL that gets run:
foo;
bar fooShape1;
Now, lets say that your foo command holds onto an MObject handle tofooShape1 for undo/redo purposes. And, lets say that the user does undo,undo, redo, redo. Your MObject may now be totally wrong. All that the foocommand is required to do for redo is to make sure that fooShape1 exists.It does NOT have to make sure that it is at the same address. Your pointercould be bogus.
You can hold onto the name fooShape1 or an MDagPath to fooShape1, and bothof those are safe. Hanging onto an MObject is a bad idea.
API Methods to Keyboard Events
No, other than ESC (like for MComputation). But you can use the system native methods:
Windows: GetAsyncKeyState
IRIX: XCheckMaskEvent
Profiling on IRIX
For versions up to Maya 4.0.1, use Purify for profiling on IRIX. Purify works on Maya which is compiled with the 7.3.1.1m version of the MIPSPro Compiler.
|
|||